Search the Internet for ‘fibre-optic connector inspection’ and you will certainly see a lot of information from just about every company you associate with fibre-optic communications.
Everyone in the fibre installation and network world is talking about inspection. In a study by NTT-Advanced Technology, 98% of installers and 80% of network owners reported that issues with connector contamination were the greatest cause of network failures.
As bandwidth demands rise, and loss budgets get tighter, specks of dust and dirt, oils and anything else on a connector endface can wreak havoc on network performance. In the world of fibre-optics, where light is transmitting through an 8-micron fibre core, a speck of dirt can be likened to a boulder in the middle of the road. It does not take much to put that low-loss connector out of commission.

The push for tighter specs has prompted a wide variety of connector inspection solutions both for manufacturing facilities and for the field. Unfortunately, many of us have realised that connector dust caps are just that: caps with dust in them. Even a very carefully controlled manufacturing environment does not ensure that your connectors are ready for mating when they arrive on site. With so much riding on your network, cleaning and inspecting are worthwhile pursuits that can prevent the need for costly troubleshooting and truck rolls later.
Seeing is believing
Many types of inspection tools are available for field use today. Most manufacturers of test equipment offer standalone field scopes for viewing connector endfaces. Many also provide scopes that plug into an OTDR or another platform with a display that will show the connector on the screen.
A new option provides a Wi-Fi connection to your phone or tablet with a free app. There are software tools that compare the connector before and after cleaning and software upgrades that provide automatic pass/fail analysis against pre-set industry or customised standards (see Figure 1).
Every vendor will give you a reason to buy its solution, but in the end, all would agree – get something to inspect your connectors. Make inspection and cleaning part of your installation/test standard practices and reap the rewards in the long run.
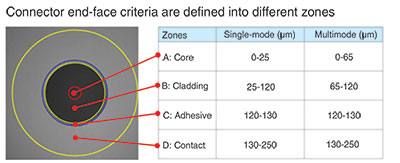
In order to properly evaluate a connector, the endface is sectioned into different zones radiating outward from the centre of the core of the fibre. Standards have been set by IEC 61300-3-35 that define the characteristics of any dirt, dust or scratches that can be found in a specific zone. Criteria are specific to MM and SM, UPC and APC and ribbon fibre connectors. The strictest requirements are, of course, found in zone A – the core of the fibre (see Figure 2).

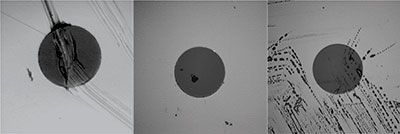
For anyone who has wiped a connector on his/her sleeve or the palm of their hand or used a regular tissue: please stop! Special materials, wipes and tools for cleaning fibre connectors have evolved over the years for a reason. They must remove anything on the connector and leave nothing else behind (see Figure 3).
Even the right products sometimes need a second swipe to get everything clean. By inspecting before connecting, you can be sure that all is clean. Some dirt and oils require more than a dry cleaning solution to really get clean. But be cautious of wet cleaning, as this can also leave a residue.

Once a connector has been properly cleaned, an inspection scope can provide only a visual check that will be subjective and relies on the technician to determine if this is ‘clean enough’. Automated products that include pass/fail analysis will provide results based on accepted industry standards, and better ensure clean mating and optimum performance. These products have software designed to quickly measure all defects found in the field of view, evaluate the size of the defect against the standard being used for each zone and then report if the endface is within specification or not.
Whichever option you choose, most vendors will agree that good practice is to inspect all fibre connectors before mating.
For more information contact Comtest, +27 10 595 1821, sales@comtest.co.za, www.comtest.co.za
| Tel: | +27 10 595 1821 |
| Email: | sales@comtest.co.za |
| www: | www.comtest.co.za |
| Articles: | More information and articles about Comtest |

© Technews Publishing (Pty) Ltd | All Rights Reserved