


I’ve been using the Arduino Uno board for quite some time, and I’ve always wondered what it would take to get the ATmega328P (the original chip used on the older Uno boards) working completely on its own. With the Arduino making it so accessible via its bootloader, nice GUI software, and C++ abstraction, you’d wonder why on earth I would want to even attempt this. Sometimes, in order to appreciate what others have done, it’s important to try doing it yourself. This project really demonstrated how much work the Arduino folks put into this and changed the world with that friendly little product.
In this article, we’ll walk through bringing up the chip completely on its own, using only an external power source and an Atmel-ICE programmer.
Environment setup
There are a few ways to configure an ATmega328P. One such way, intentionally not covered as you can tell by the title, is by dropping your ATmega328P chip into an Arduino Uno, programming it, and then moving it over to a breadboard. Based on feedback in forums, some folks want to skip the Arduino process and use a more traditional approach with programmers such as the Atmel-ICE from Microchip. The most straightforward way to start with a Microchip (formerly Atmel) microprocessor is to install Microchip Studio. At the time of writing this article the full Microchip Studio suite is supported only in Windows. Since I like to have all my build environments run in CI (Continuous Integration), I opted for an alternative approach.
The GNU Compiler Collection (GCC) is one of the most popular compilers available for the C language. It compiles certain platforms and architectures, but not for the AVR (ATmega) family of chips. There is, however, a set of compilers for the AVR and other Microchip families hosted on their website. Luckily, these compilers have been packaged into nice Debian packages that can easily be installed in Debian or Ubuntu as follows:
With these tools installed, code is now able to be compiled and the ATmega328P can be programmed with only an Atmel-ICE programmer and an external power supply set at 5 V. The AVR version of GCC will be used to compile the code and AVRDUDE will be used to flash the ATmega328P chip.
The project
For this project, the goal was to demonstrate some basic, but functional, capabilities of the ATmega328P. A simple external LED and some serial commands back and forth were all that were needed to prove that this chip could stand on its own.
An important component to software development is unit testing. Unit testing validates that the functions or pieces of the larger system are working as expected. If someone comes along and modifies a piece of that functionality, the unit test will prevent regressions from happening (that is, you unintentionally broke something else by introducing a new feature).
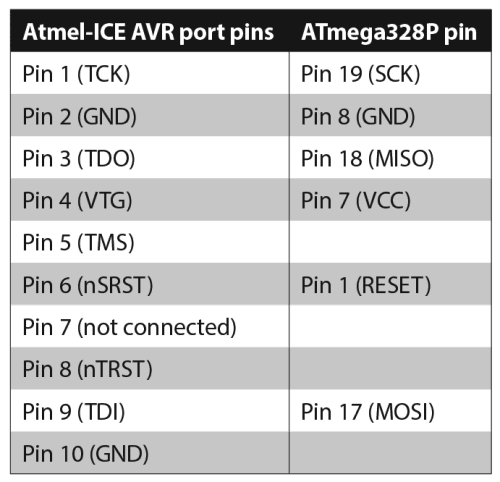
The pinout used to connect the Atmel-ICE programmer to the ATmega328P chip is shown in Table 1.
Adding a few LEDs, hooking up the serial communication port to a Raspberry Pi, and picking off the Raspberry Pi’s 5 V line, a full assembly ready for testing is available.
Testing, compiling, and more testing
As you develop new features, use the Makefile to run unit tests and compile the code. After validating that your desired code does what it is intended to do (via unit test validation), build the binary, flash it onto the device (also via the Makefile), and run testing using the Raspberry Pi’s serial communication port.
One of the most important pieces is correctly flashing the fuse bits to enable the internal 8 MHz clock. This is added to the flashing command in the Makefile:
After that, the chip’s serial interface should be able to be used with the assumption that the onboard clock runs at 8 MHz (as defined in the top of main.c). From here, more functionality can be added, such as support for additional serial commands, or interfaces to external components and sensors.
Conclusion
In this article, brief instructions on how to get started with the ATmega328P chip, without any external circuitry, were given as commonly seen with the original Arduino Unos and Microchip evaluation boards. Additionally, there was an important detail, often overlooked, about programming the fuse bits to set the internal clock to 8 MHz. At this point, one should be able to add more functionality with additional tests, and run everything with just an Atmel-ICE programmer and an external 5 V supply. For simplicity, utilising a Raspberry Pi for its power source and serial communication capabilities is one of the easiest ways to control the process end-to-end.
The project’s source code can be found by visiting https://bit.ly/4eVcEes


© Technews Publishing (Pty) Ltd | All Rights Reserved
 printer friendly version