A poor or incomplete calibration can lead to significant errors in your measurements. The time to develop a product may exceed your original schedules and production yields may be too low if the test instruments are not performing to specification.
If your test instruments are not measured during calibration to the specifications you depend on, the devices you test are at risk. That can be costly. A detailed calibration report is the only way to verify for sure that your instruments are performing to specification.
Why calibrate?
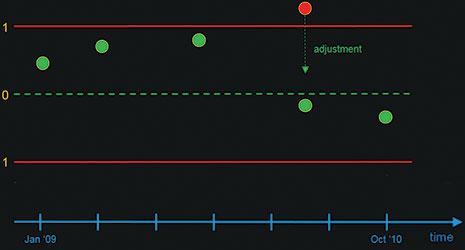
The warranted specifications of electronic instruments often rely on the ability to fine-tune the hardware under microprocessor control, for example amplifier gain, filter corners, DC offsets, and other functions are all adjusted during the production process. Over time, depending on the measurement environment and component ageing, drift can occur. Sometimes this drift is linear over time, as shown in Figure 1. Other times sudden shifts happen. Similarly, torque wrenches or precision thermometers can change based on how they are used (or abused).

The whole point of sending your instrument for calibration is to accurately measure the current performance to address the questions “Is it still fit for use? Can I continue to count on the warranted specifications?” Your measurements matter, since you make pass and fail decisions based on them.
Proper periodic calibrations identify any out-of-tolerance test equipment drift and correct for it in a timely manner, ensuring that the accuracy of the test equipment you rely on to make your pass/fail or design troubleshooting decisions is the least of your worries.
What is calibration and what needs calibrating?
Calibration is periodically verifying instrument specifications by measuring actual performance using lab standards that in turn have better performance and are traceable to the International System of Units (SI) through standards maintained by national metrology institutes (NIST, NPL, PTB, NMIJ, etc.)
Depending on the service provider and the type of device, when an instrument is observed out-of-specification the calibration service may include adjustments. Electronic instruments usually require proprietary knowledge of the internal architecture, so generally only the OEM can adjust them. Dimensional standards such as gauge blocks can’t be adjusted, only replaced if sufficient wear has occurred. Mechanical torque wrenches can usually be adjusted if needed.
Quite simply, any instrument that you use and rely on for the warranted specifications needs periodic calibration. Before selecting a calibration supplier, it is a good idea to ask them to review your instrument population and tell you which ones they can perform adjustments on when measurements indicate that they are out-of-specification. For instruments they have to send to an OEM, ask if that is considered a ‘repair’ (extra time/extra cost).
What happens when an instrument is out of specification?
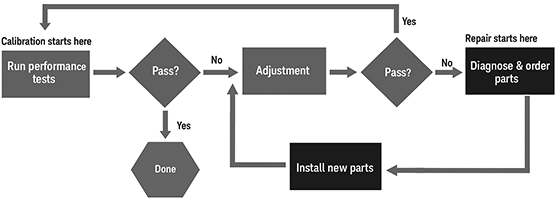
Many, if not most, people assume that when they submit an instrument for calibration, the service includes adjustments ‘to the middle of the tolerance interval’. In fact that is not true, as shown by the calibration and repair process flow in Figure 2.

Calibration laboratories run a series of performance tests. If your instrument is observed in-specification ‘as received’, you’ll receive a single report indicating that it. When an instrument is observed out-of-specification (or out-of-tolerance) your provider may be able to perform adjustments. Note that for many modern electronic instruments, adjustments require complex iterative external measurements and calculations to characterise the instrument while changing internal DAC settings.
When your provider does perform adjustments you should expect to receive the measured results both of the initial performance when you submitted the instrument, and after adjustments are performed. This way you can determine the impact of your pass/fail decisions on your own products while using an out-of-tolerance instrument. The second measurement report, ‘as completed’ is proof of being fit for continued use.
Calibration impacts business results
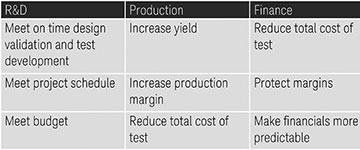
Your measurement results have a direct link to business results. Whether you are the lab manager responsible for time to market or a production engineer responsible for yield, calibration can affect your results. The impact of calibration varies by team, as shown in Figure 3.

Being first to market or first to production is critical in many industries. In wireless, the first company to innovate in evolving technology standards has the leading edge in market position. Required customer specifications may come from marketing research or external standards.
Either way, before a design prototype can proceed to production it must pass a design review where measured performance exceeds target specifications with suitable production margin. If a design fails to meet a target test line limit, then engineers have to re-submit new chip fabrications or board layouts. Extra material fabrication costs and lost time associated with re-testing can have large negative implications to a company’s revenue stream.
So how does calibration fit in? Whenever pass or fail decisions are made, such as a checkpoint for transitioning a design to production, measurement errors from instruments operating out of specification can result in either falsely rejecting a ‘good’ product or falsely passing a ‘bad’ product.
Calibration also ensures data correlation through your design chain through to manufacturing teams. This keeps the teams from wasting time identifying where a problem exists.
For more information contact Tshiamo Mogakwe, Concilium Technologies, +27 12 678 9200, [email protected], www.concilium.co.za
| Tel: | +27 12 678 9200 |
| Email: | [email protected] |
| www: | www.concilium.co.za |
| Articles: | More information and articles about Concilium Technologies |

© Technews Publishing (Pty) Ltd | All Rights Reserved