Modern semiconductor packaging techniques are one of the main factors behind the new generation of faster and more powerful ICs. Modern packages such as FBGAs, FlipChips, etc, ensure lower circuit inductances.
Connections can be made directly throughout the silicon wafer, rather than being concentrated around the perimeter, and this results in better noise immunity within the core.
Working with such devices, however, presents a challenge to electronics manufacturers. The problem is that solder joints are hidden from view and cannot be inspected by conventional means. This has given rise to the use of non-destructive X-ray inspection. In particular, Realtime micro-focal X-ray systems have been at the heart of the process and quality control of silicon die packaging manufacturers and electronics manufacturers alike.
Realtime micro-focal X-ray
Realtime micro-focal X-ray systems are able to offer geometric magnification by virtue of their tightly-controlled emission area, with focal spot sizes in the region of hundreds of nanometers. As the sample is moved closer to the source, the region of interest, casting its shadow on the imaging device, is magnified by up to 2400 times. Further imaging magnification can increase the total system magnification to 6000 times.
Most realtime micro-focal X-ray systems offer programmable inspection routines with 'Pass-Fail' criteria and the ability to export analytical data. To detect open solder joints within FBGAs, μBGAs and FlipChips it is required to view the solder joints obliquely at high magnification, to monitor the presence of gaps and the correct wetting of balls. This, however, exposes a limitation of conventional micro-focal systems, as viewing the sample obliquely moves the solder joint away from the X-ray source, thus reducing magnification. This results in a compromise between the angle of view and the desired magnification.
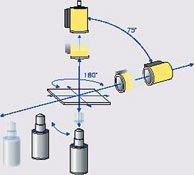
A realtime micro-focal X-ray system that allows the imaging component to view the X-ray source obliquely, such as in the vertically configured system depicted in Figure 1, overcomes this limitation.

By keeping the X-ray source close to the underside of the sample tray, the geometric magnification of the system is preserved. When an oblique view is required, the imaging device is moved from the vertical position towards the horizontal, giving an oblique view of the X-ray source through the sample, with no loss of magnification. This system will allow maximum system magnification at all viewing angles up to 75°, the optimum view angle to ensure correct soldering.
In addition, using a feature called 'true concentric imaging' keeps the region of interest in the centre of the screen. Once the operator has chosen a region of interest to inspect and positions it in the centre of the screen, it will remain locked to the centre of the field of view under all conditions of angular views, rotation and magnification. This is particularly useful, enabling the operator to fully orbit single balls within a BGA whilst viewing obliquely.

A 'true parallel tracking' feature offers faster inspection. A combination of angular view and rotate is required to give the best, unobstructed view of BGA balls. The next step is to scan along the rows to inspect for failures. With standard manipulators, this necessitates the simultaneous operation of three axes - requiring considerable operator skill. True parallel tracking maintains the X and Y axes parallel to the BGA, allowing the rows to be scanned using a single X or Y axis.

In conclusion, by superior manipulation techniques, many of the limitations of the traditional realtime micro-focal X-ray systems aimed at electronic manufacturing can be overcome. The more definitive images and ease of navigation allow quicker set-up times for automated inspection routines with more accurate and repeatable results.
For more information contact Paul Keanly, X~Sight X-ray Services, +27 (0)21 856 4920, [email protected]

© Technews Publishing (Pty) Ltd | All Rights Reserved