Manufacturing / Production Technology, Hardware & Services


Conformal coating process control and inspection

EMP 2017 Electronics Manufacturing & Production Handbook Manufacturing / Production Technology, Hardware & Services

There is definitely an increasing interest in conformal coating for electronics, based on recent workshop and seminars run by the SMART Group in the UK and other organisations worldwide. I recently rekindled my interest and knowledge on the subject for a workshop session at SMT Nuremberg. Things have moved on a long way since my time as an apprentice using brush and manual spray coating techniques within GEC. Producing operator instructions and inspection criteria for the number of brush hairs allowed in a coating seems like a lifetime ago.

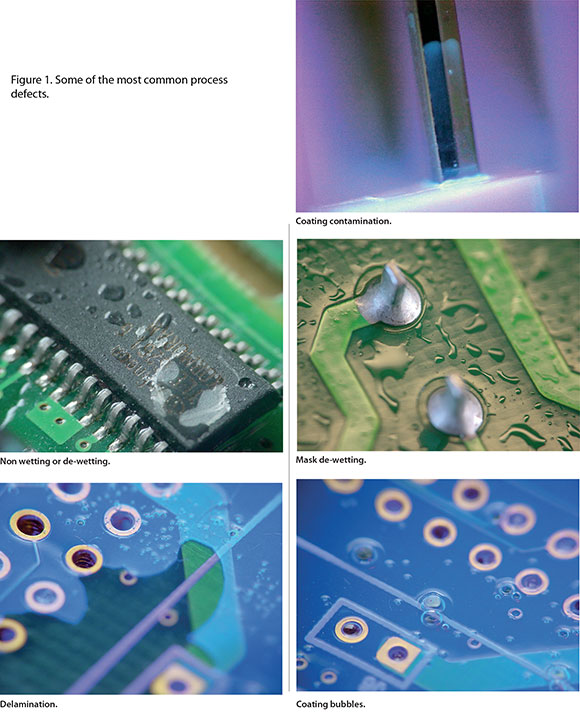
Simple process control checks can be invaluable during conformal coating. These may vary depending on the type of product, material, volume, application and design density. Some of the most common process defects are shown in Figure 1. Checking the wet coating thickness on the surface of the board after application, or alternatively on a blank panel, will make measurement simpler. Using a wet depth gauge, check the coating in two or three areas on a sample board, and ideally check more than one sample in a batch. Record the reading, location, material and process parameters for future reference.
Coating a blank test board prior to running production or using a proprietary matrix test card like that used by Nordson ASYMTEK is a good way of checking spray process parameters (Figure 2). The test board or card can be inspected with a long-wave UV light for coating definition, overspray or coating run-on. Process parameters like solids content, temperature, nozzle type, speed, height and pressure can be recorded with the sample and retained for reference.
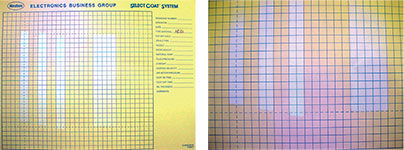
Figure 2. A test card from Nordson, shown with and without UV light illumination on spray patterns.

Measuring dry coating can be performed on a test label applied to the surface of a board prior to coating. The thickness of the dry label can be recorded prior to coating; subtracting the thickness of the label provides the coating thickness in that location. The label can be retained for future reference and is ideal for engineers to review during process audits. Digital thickness measuring systems are available for logging data for SPC.

With care, coated boards can be examined directly after spray coating using a UV light source on an outfeed conveyor. Care needs to be taken to avoid contamination and disturbance of the coating. Surface contamination with hairs, fibres or other particulate can be a problem with a delay before curing. Recent introduction of automatic optical inspection (AOI) specifically designed for coated boards can be used as off-line or in-line inspection with software which has been specifically developed for coating defects.

When coated boards are cured in a convection or IR oven the temperature profile must be established based on the material supplier’s recommendations. The profile must also be considered in relation to the coating thickness. Temperature profiling procedures should follow the techniques used for reflow soldering with the correct attachment of thermocouples. Attempts to speed up the curing cycle is a common cause of failures.

Inspect sample boards under UV lighting for complete coating coverage. Check areas of the board after removal of any masking for contamination or lifting of the coating at the masking interface. The coating should be compared with any work instructions, alternatively a golden coated board assembly should be available for reference. Obviously in high volume is where AOI systems will have an impact in the future.

During sample inspection of boards all defects and touch-up of the coating must be recorded for future review. Inspection should be based on documented inspection criteria or customer specification. Where new defects or PCB design specific issues are seen they should be photographed and added to inspection criteria, training updates or included with customer specific instructions.

Figure 3. Conformal coating charts are available from <a href="http://www.bobwillis.co.uk" target="_blank">www.bobwillis.co.uk</a>
Figure 3. Conformal coating charts are available from www.bobwillis.co.uk

Having images of common process defects and examples of satisfactory coating (see Figure 3) to include in PowerPoint training modules or for onsite work instructions is an ideal resource for process and quality engineers tasked with training sessions.

For more information visit www.bobwillis.co.uk


Share this article:
Share via emailShare via LinkedInPrint this page

Further reading:

20 years of precision, progress and purpose – the Jemstech journey
Jemstech Editor's Choice Manufacturing / Production Technology, Hardware & Services
Twenty years ago, Jemstech began as a small, determined venture built on technical excellence and trust. Today, it stands among South Africa’s leading electronic manufacturing service providers.

Read more...
An argument to redefine IPC class definitions for class 1, 2, & 3 electronics
MyKay Tronics Manufacturing / Production Technology, Hardware & Services
One of the most critical aspects of electronic assembly reliability is cleanliness. Contaminants left on a circuit board after the reflow process can lead to failures through mechanisms such as electrochemical migration or corrosion.

Read more...
Large platform stencil printer
Techmet Manufacturing / Production Technology, Hardware & Services
GKG’s large platform stencil printer, the P-Primo, is designed to meet customer’s ultra-large printing requirements by supporting board dimensions up to 850 x 610 mm.

Read more...
Press-fit component inspection
MyKay Tronics Manufacturing / Production Technology, Hardware & Services
In electronics manufacturing, optical inspection of press-fit components is crucial to ensure the quality, reliability, and performance of the final assembled product.

Read more...
A new era in wire bond inspection
Techmet Editor's Choice Manufacturing / Production Technology, Hardware & Services
Viscom is developing a 3D wire bond inspection system that incorporates substantially improved sensors, a high image resolution, and fast image data processing.

Read more...
High-speed, high-resolution material deposition system
Manufacturing / Production Technology, Hardware & Services
ioTech recently unveiled the io600 inline digital laser material deposition system at productronica 2025.

Read more...
Mycronic’s MYPro A40 pick-and-place solution
MyKay Tronics Manufacturing / Production Technology, Hardware & Services
Mycronic’s MYPro A40 pick-and-place solution, equipped with an MX7 high-speed mounthead technology, increases top placement speeds by 48% over the previous generation.

Read more...
Why ergonomics matters in digital microscopy
TANDM Manufacturing / Production Technology, Hardware & Services
While magnification technology has kept pace with demand, the wellbeing of the people behind the microscopes has often been overlooked with technicians spending long hours in intense focus, leading to chronic strain, fatigue, and costly mistakes.

Read more...
From ER to effortless: The 15-year journey of Seven Labs Technology
Seven Labs Technology Editor's Choice Manufacturing / Production Technology, Hardware & Services
What started as a business likened to an ‘ER’ for electronic components has today grown into a trusted partner delivering kitting services and full turnkey solutions – taking the effort out of electronics and helping customers truly ‘Move to Effortless.’

Read more...
Choosing the right electrical component supplier for reliability and scale
Rebound Electronics Manufacturing / Production Technology, Hardware & Services
Selecting the right supplier extends beyond cost or delivery time; it is about ensuring long-term reliability, compliance, and scalability.

Read more...


While every effort has been made to ensure the accuracy of the information contained herein, the publisher and its agents cannot be held responsible for any errors contained, or any loss incurred as a result. Articles published do not necessarily reflect the views of the publishers. The editor reserves the right to alter or cut copy. Articles submitted are deemed to have been cleared for publication. Advertisements and company contact details are published as provided by the advertiser. Technews Publishing (Pty) Ltd cannot be held responsible for the accuracy or veracity of supplied material.


© Technews Publishing (Pty) Ltd | All Rights Reserved