


The tip of any soldering iron is the most critical component in the performance of the tool. If it cannot perform its function of effective heat transfer to the connection point, the soldering iron itself will be unreliable. Poor tip maintenance is one of the leading causes of soldering problems.
Soldering tips wear out over time and eventually need replacing, but taking steps to care for your tips can extend their life, save you money and improve the results of your soldering work. Follow these tips to reap the benefits of proper soldering iron tip care.
Using high-quality solder
One of the best preventive measures you can take to protect your solder tips is to use high-quality solder. If you use low-quality solder that contains impurities, those contaminants may build up on the tip, get it in the way of heat transfer and make your soldering work more difficult.
Purchasing solder from reputable brands is one way to increase certainty that the product will be of high quality. You can also test the quality of solder by heating it and observing how easily it melts. Good-quality solder should melt readily at the expected temperature, while low-quality solder may not melt completely. Most 60/40 (tin/lead) solder, for example, should melt easily at around 238°C.
If you use solder that contains lead, the appearance will also give you an idea of its quality. Melted lead solder will appear shiny, while a low-quality product will look more matte. High-quality melted lead-free solder also has a matte appearance.
Different types of solder will act differently, so it’s essential to check the manufacturer’s description to ensure it performs as expected.
It’s also vital to choose the right type of solder for your project. The composition you want depends on the material you plan to solder and whether you’re using flux, as well as health and safety concerns. The US Safe Water Drinking Act, for instance, requires you to use lead-free solder on all lines that will carry drinking water. The size of the project will determine the solder diameter that’s right for you.
You should also take care to only use as much solder as you need. Excess solder can end up in the socket or base, and cause short circuits and jammed switches.
Maintaining optimal temperature
Keeping the temperature of your tips as consistent and as close to optimal as possible will help extend their life.
When using many soldering irons, the temperature of the tip will naturally decrease when in use. To compensate for this, many solderers turn up the heat more than is needed. Using excessive temperatures, however, reduces the life of your tips and can lead to sub-optimal results.
Soldering station irons that have a temperature sensor can help regulate temperature for you without damaging your tips. These irons can sense when the temperature has dipped or risen out of the intended range and automatically adjust it. Some soldering irons have more accurate temperature regulation than others. Recovery time, which is the time it takes the tip to return to the desired temperature, also differs between soldering iron models.
The temperature you set the iron to also impacts tip life. Avoid using temperatures that are higher than you need them to be to help protect your tips. This principle also applies when you aren’t actively using your iron. Make sure to reduce the temperature to an ‘idle’ setting or turn off the unit when not using it for extended periods. Some irons will automatically decrease their temperature when not in use.
Weller soldering irons offer excellent temperature stability. The WEP70 iron of the Weller WE 1010, for example, has a temperature stability of plus or minus 6°C. It also has a standby mode and auto setback feature that reduces the temperature of the iron when it’s idle.
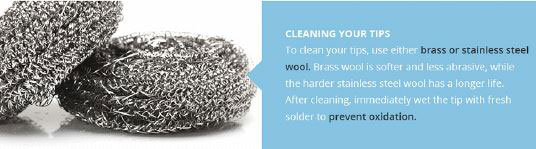
Cleaning your tips
To care for your equipment, you need to know how to clean soldering iron tips. Keeping your tips clean is crucial to ensuring that they perform properly, and it can also extend their life. You should clean them before, during and after use. You can tell your tip is clean when it appears bright and shiny.
Before soldering, use alcohol and a clean cloth to remove contaminants such as grease, corrosion and oxidation from the surface to be soldered. To clean your tips, use either brass or stainless steel wool. Brass wool is softer and less abrasive, while the harder stainless steel wool has a longer life.
Metal wool effectively removes dirt and other contaminants and avoids issues associated with using a damp sponge to clean soldering tips. Using a wet sponge will reduce the heat of the tip. Frequent wiping with a damp sponge causes repeated changes in temperature, causing the tip to expand and contract repeatedly. This cycle causes metal fatigue and eventually the failure of the tip.
Cleaning wool will not reduce the temperature of the tip. To remove small amounts of contaminants from your tips using metal wool, gently dab them into the wool. For more stubborn residue, hold the iron more firmly and apply more pressure when rubbing it against the wool. Vary the strokes, so you remove contaminants from all sides and edges of the tip.
After cleaning, immediately wet the tip with fresh solder to prevent oxidation. For heavier-duty cleaning, you can occasionally use a Weller WPB1 cold-tip polishing bar. Only use this device when the tip is cold, as using it with a hot tip can damage the tip.
If a tip does become oxidised, flush it several times with a rosin-activated, flux-cored solder. That should remove the oxides unless you have allowed the oxidation to build up excessively. After cleaning, cover the tip surface with a thick coating of solder.
Using flux
When many metals come into contact with the oxygen in the air, they form an oxide layer. This layer of oxidation prevents solder from adequately wetting the joint and negatively impacts the quality of the solder joint.
Flux is a substance that removes this oxidation layer. The flux dissolves the metal oxide layer, which evaporates once the flux reaches its boiling point. Flux may come in paste form, or it may be in the core of a soldering wire, which allows it to work as you are soldering the part with no extra effort.
Avoid dipping your tips into flux to clean them, as the substance is corrosive. Some fluxes, called water-soluble fluxes, can damage tips at higher temperatures. Many solderers only use these fluxes when doing projects that require wave soldering, immediately followed by a full cleaning to remove excess flux residue on the circuit board. Using wire solder and water-soluble flux for touch-up and rework operations will still hasten tip failure.
Another type of flux, no-clean flux, is only for soldering parts that require little to no cleaning. This very mild cleaning action normally isn’t thorough enough to remove oxidisation from soldering iron tips. A badly oxidised tip will be easy to spot because of ‘burnout,’ which is the appearance of black or brown coating.
Tinning your tips
You should tin your tips before and after each soldering session, as well as in between soldering every two to three joints. You want to keep your tip tinned at all times, from the first time you use it until you discard it. When you tin a tip, you cover it with a thin layer of solder.
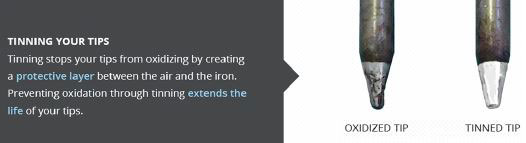
Tinning stops your tips from oxidising by creating a protective layer between the air and the iron. It’s essential to keep your tip tinned, since iron oxidises rapidly. Oxidation prevents the tip from transferring heat efficiently. Preventing oxidation through tinning extends the life of your tips.
Keeping your tips tinned also helps make soldering easier. It helps your solder wire melt and flow better, making soldering easier. The coating creates a heat bridge between the tip and the part you’re soldering, which increases the efficiency of the heat transfer.
To tin a tip, follow these steps: First, clean the tip. Then, apply fresh solder to the tip. Use a small amount – enough to coat it thoroughly. The tip should still appear shiny.
If you are just starting your session, begin soldering as soon as you finish tinning the tip. Throughout a project, clean and then tin your tip after every few joints. If you’re tinning a tip after completing a project, wipe the tip again briefly after tinning and then turn the iron off and put it away.
Reactivating your tips
If a tip becomes oxidised, it will appear dark, and you may not be able to tin it. To fix this problem, you can use a tip activator to reactivate or re-wet it.
To reactivate the tip, dip it into the paste-like activator substance and move it around until it starts to become shiny again. The fine abrasives and additives within the activator will break down and remove the oxide layer.
Once the tip looks mostly clean, remove it from the activator and clean it using brass or steel wool. Then, re-tin it immediately. Flushing the tip with solder by re-tinning it will remove any remaining contaminants. Then, clean it and re-tin it again. You should then be able to use the tip without trouble.
Storing tips
The way you store your soldering iron tips can also impact how well they perform and how long they last. Following some simple procedures when storing your tips can help protect them.
When storing a tip for a shorter period, such as between soldering joints in one soldering session, store it in the iron in a secure iron holder. Ensure it does not stay at the operating temperature, as this will decrease the life of the tip. You can store many Weller irons at an idle setting, which keeps them at a lower temperature but still ready to be used.
If storing your tips for an extended period, you should clean and tin them before putting them away, which will help prevent them from oxidation. After letting them cool, you may also want to store them in a sealed container, such as a bag or case, to further protect them from oxidation, humidity and contamination.
When storing a tip in the iron, loosen the nut or screw that holds it in place before putting the iron away. This practice will prevent the tip from becoming stuck, an issue known as seizing.
Changing soldering iron tips
Weller seeks to make it easy to remove, change and reinsert its soldering iron tips, and it doesn’t take long to learn how to do this. With the WE 1010 soldering iron station, for example, you can manually change out tips without any additional tools.
When inserting tips, always make sure you have positioned them correctly in the barrel. You can keep the screw or nut that secures the tip slightly loose to prevent it from seizing. Many Weller models have a stainless steel liner in the sensor hole in the base of the tip to prevent the tip from seizing to the sensor.
Recycling your tips
When you use high-quality products and take proper take care of them, they can last an extraordinarily long time. Eventually, though, tips wear out. Weller makes it easy to dispose of your tips in an environmentally friendly and economical way, and even offers a voucher you can put toward your next purchase of Weller tips if you mail your used tips to the company for recycling.
| Tel: | +27 11 704 3020 |
| Email: | [email protected] |
| www: | www.ama-sa.co.za |
| Articles: | More information and articles about Allan McKinnon & Associates |


© Technews Publishing (Pty) Ltd | All Rights Reserved
 printer friendly version